How to manage emails by DISPLAY name.
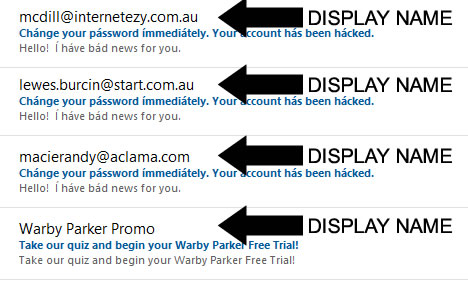
Display name is the name given to the field we see in the Inbox, sometimes confused as the Sender Name.
For many years this proved to be an issue because AntiVirus (AVG), SPAMFighter and Outlook were unable to deal with spam emails from repetitive senders.
Message rules failed because the process is based on the senders email address not the sender name.
We discovered Outlook has separate fields for the Sender name and the Display name.
The process creates a rule to manage emails based on word/s in the Display Name field field
We went from 250 emails inbox to an average of 30.
How To Automatically Filter And Block Emails By the DISPLAY NAME In Outlook?
PS: the title says “By Sender Names” but its “Display Name”
Software: Microsoft Outlook for Office 365
Source: www.extendoffice.com
How To Automatically Filter And Block Emails By DISPLAY Names In Outlook?
Step 1: Shift to the Mail view, and open the Rules and Alerts dialog box.
- In Outlook 2007, please click the Tools > Rules and Alerts.
- In Outlook 2010 and 2013, please click the Rules > Manager Rules & Alerts on the Home tab.
Step 2: In the Rules and Alerts dialog box, please click the New Rule button.
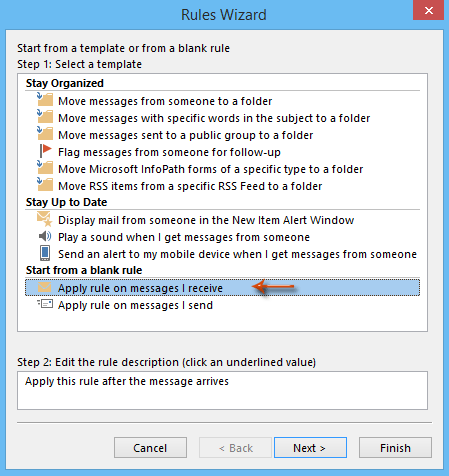
Step 3: Now you get into the Rules Wizard dialog box. Click to highlight the Apply rule on messages I receive (or Check messages when they arrive in Outlook 2007), and then click the Next button.
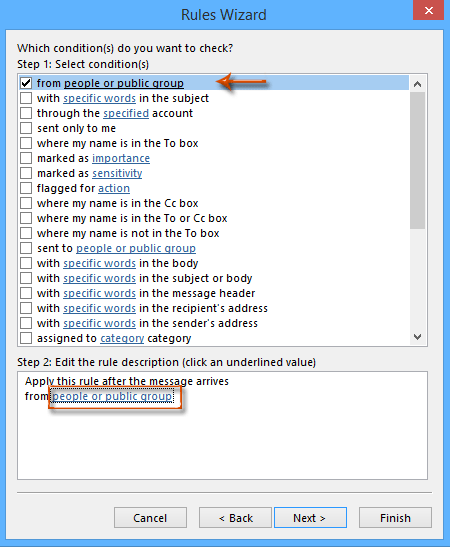
Step 4: In the second Rules Wizard dialog box, check the from people or public group, and then click the text of people or public group.
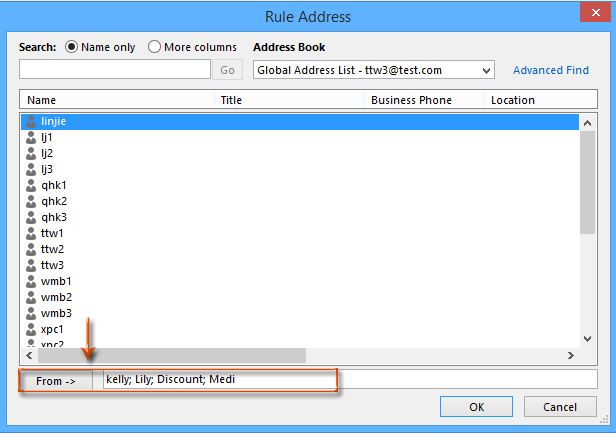
Step 5: Then the Rule Address dialog box comes out. Type the display names of senders whose email you want to filter and block into the From box, and click the OK button.
- Note:
You can type the senders’ full display names, or just a certain keyword of it.
Separate multiple display names of senders with semicolon (;).
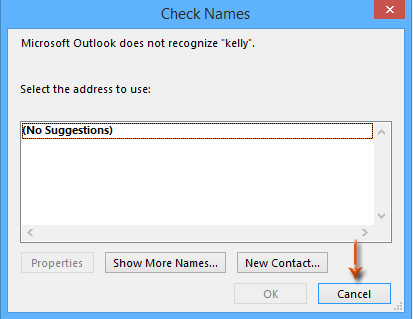
Step 6: In the popping up Check Names dialog box, click the Cancel button.
Step 7: Now you get back to the Rules Wizard dialog box, and click the Next button.
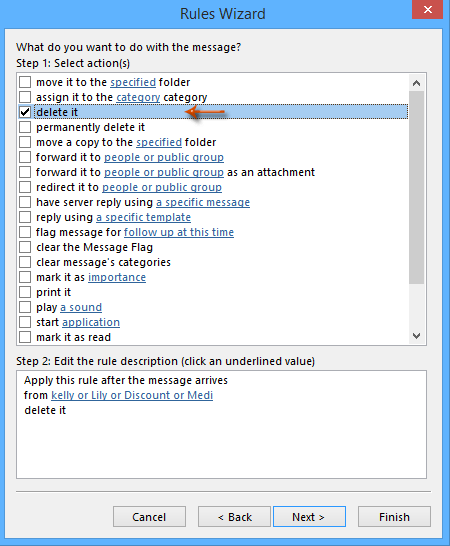
Step 8: In the third Rules Wizard dialog box, check the delete it and click the Next button.
Step 9: Click the Next button in the fourth Rules Wizard dialog box.
Step 10: Now you get into the fifth Rules Wizard dialog box, type a name for this new rule in the box below Step 1: Specify a name for this rule, and click the Finish button.
Step 11. Then it will return to the Rules and Alerts dialog box, please click OK button to complete the whole settings.
Note: It’s optional to check the option of Run this rule now on messages already in “Inbox”. If you check this option, it will filter and delete all existing email messages whose sender’ display names meet the condition you specified in Step 5.
